Associate Teaching Professor of Linguistics at UC San Diego
Director of UCSD's Computational Social Science Program
Keyboard Ergnomics and Kinesis Freestyle Solo Mac Review
This was originally posted on my blog, Notes from a Linguistic Mystic in 2013. See all posts
This is the third of a small series of posts on computer ergonomics and how I’ve banished computer-use-related pain. As always, I have no affiliate links, kickbacks, nor relation to the companies whose products I’m reviewing, and these reviews are simply posted as a service to the internet in general. For full background, read the first post in the series here and the second post here.
Between the Rollermouse and adjustable-height desk, I was 90% pain free. But there was one more area which still needed some help.
Keyboard Ergonomics
Although many people are selling many different approaches to typing, there were a few ergonomic facts that nearly every resource I found agreed on:
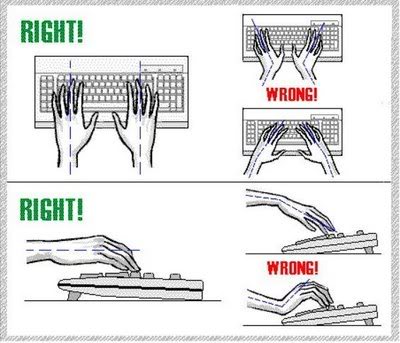
- Your arms should be perpendicular to front of the keyboard
- Your wrists should not be horizontally bent as your hands sit on the homerow
- Your keyboard should be at a height where your forearms are roughly level typing on it.
- Your wrists and hand should be in roughly a straight line, vertically speaking
- Your mouse should be as near to the keyboard as possible.
Here’s a cute little graphic (source) which demonstrates 1-4 in use:

I’ve used (for many years) an Apple Wireless Keyboard, which is a great little unit, and its compactness helps keep the mouse at hand (addressing issue #5). However, even once at the proper height, it has some flaws. First, its’ upward angle encourages vertical wrist-bending (like in the lower right of the diagram above) (Issue #4). Also, and more problematically, its’ (extremely) compact size forces people with broad shoulders (like myself) to angle the arms together approaching the keyboard, then splay the wrists back out to reach the proper key positioning (Issues #1 and 2). This is a major ergonomic issue for most laptops, as well.
I realized that this arm angle issue was perhaps the biggest remaining ergonomic problem I had, so I set out to find a way to fix it.
The Kinesis Freestyle Solo for Mac
The biggest problem I had was finding a keyboard that was friendly to a broad shouldered person like myself. The majority of ergonomic keyboards address this problem by being very contoured (the exemplar of this class being the Microsoft Natural Ergonomic Keyboard line). This is great for 1-4 above, allowing the wrists and arms to be in a more natural position while typing, but unfortunately, because these tend to be very large keyboards, they tend to to force your mouse to migrate well across the desk, and the contour on the front makes using a Rollermouse nearly impossible.
Luckily, it appears that fate wants me to have good ergonomics. As I was searching around on Craigslist, I happen to find somebody selling a Kinesis Freestyle Solo keyboard for Mac for $40 nearby, so, of course, I jumped on it.
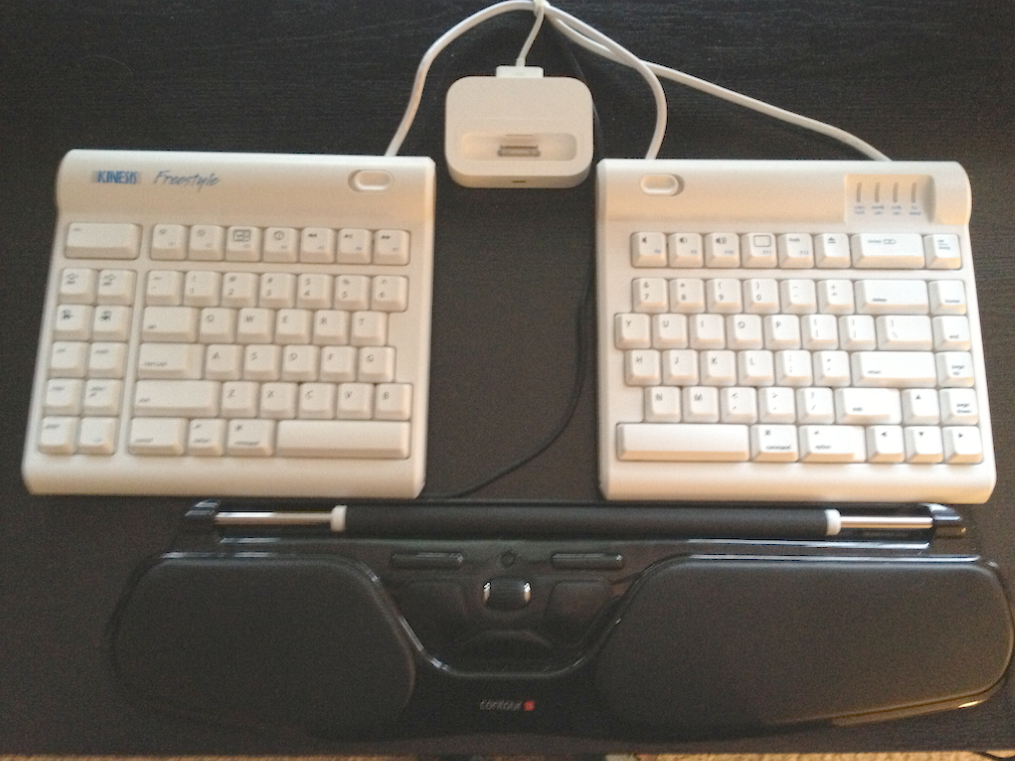
Although it was the first generation version of the Kinesis Freestyle line (they’ve since moved to the Freestyle 2), it offered exactly what I needed: a keyboard which allows me to type with my arms more separated, allowing my wrists to remain straight even while typing. Mine even came with their “VIP” kit, which allows you to tent the two halves of the keyboard up a little bit more as you type, but because I use the roller mouse, I really haven’t found this necessary. Apparently, they also sell a kit which allows you to mount the two halves vertically, although I can’t possibly imagine using that on any regular basis. My final setup, as you can see below, is relatively straightforward (the white box at the top is an iPod/iPhone dock):

On the whole, I very much like this keyboard. The split design allows me to spread the two halves apart and type with my arms at the proper angle, it has more keys than my Apple wireless keyboard did (although it’s very easy to hit the “home” key instead of “delete”, and it’s just a little bit thicker than the roller mouse, allowing me to rest my palms on the mouse’s pads as I type. also, I’ve had no problems at all with the Apple specific button assignments for the function keys, and although it’s a little frustrating that they’re not the same positions here that they are on most modern Apple keyboards, I’ve never had a problem with them being recognized.
My one complaint with it is that the key feel isn’t at all satisfying, and the unit itself just feels cheaper than the Apple Keyboard, or even modern Razer devices. The key switches are certainly not mechanical, and although the pressure required to activate the rubber-dome switches is pleasantly light, it still feels rather mushy and noncommittal, and it’s hard to tell whether you hit a key or not. This may be something they’ve addressed in the Freestyle 2, but the moment they sell a version of this with mechanical switches, I’ll be on the pre-order list.
Pickiness about switch type aside, I would highly recommend this keyboard to anybody having arm angle issues, or simply looking for ergonomic keyboard that gives you plenty of options and ability to move around your typing position. Although I got an incredible deal on it, if I had to replace it tomorrow, I would gladly pay full retail ($129) for the new version.
Hitting the ‘End’ Key
So, between the adjustable height desk, the roller mouse, and the Kinesis Freestyle Solo keyboard, I’m now in a place where I’m largely pain-free, and I can do a full day of work at the computer, alternating between standing and sitting, with relatively little physical consequence.
As you can imagine, I’m absolutely overjoyed by this, and even though it cost me a fair amount of money to acquire the gear I needed to get there, I really do feel like it’s money well spent.
In my last post, I want to talk about some of the other steps that you can take to improve your computer usage and reduce pain without opening your wallet.
Until next time.