Associate Teaching Professor of Linguistics at UC San Diego
Director of UCSD's Computational Social Science Program
- Resources:
- Teaching Resources
- Supporting Students
- Using Praat
- Using Unix
- Course Design
- The EnronSent Corpus
- Github
- 2022 Legacy Lecture
- Please note that many media, images, and links may be broken at the moment as I work to come into compliance with new federal accessibility standards.
Using IPA fonts with MacOS: The Comprehensive Guide
This was originally posted on my blog, Notes from a Linguistic Mystic in 2007, but is kept updated here for the internet’s use. At this point, it works for any version of MacOS including 13, ‘Ventura’. The last update was February 2023. Also, please see this post on Espanso and IPA to see how I do most IPA in my life these days, and if you’d like, you can see all my posts
As a linguist, you find yourself using the International Phonetic Alphabet (IPA) incredibly frequently. Some of the characters are easy enough to use without any special work (ŋ, ə), as most fonts already include them. However, to get the more cool/obscure characters and diacritics, or to stack diacritics (placing, for instance, a tone marking above a nasal marking), you need special fonts, layouts and setup. In this post, I’m going to explain, as simply as possible, how to go about finding the files and setting this up, all without paying a dime for specialty software.
Getting the fonts and layout
The beauty of this method is that it uses software built into Mac OS X, and that you can use IPA fonts in any application that supports Unicode (translation: lots of them), not just specific programs. You also don’t need to install a separate program to clutter up your computer, just a few free fonts and a keyboard layout. So, here’s your freeware shopping list:
Necessary files:
Charis SIL IPA Font - The best free IPA font out there (in my opinion) because it has bold, italic, and all sorts of other characters outside of IPA. The download link is around halfway down the page, grab the file with “(Windows, Macintosh and Linux)” next to it. Thanks to the Summer Institute of Linguistics, it’s completely free!
The Unicode IPA Keyboard Layout for OS X - SIL has created a comprehensive and modern version with every key you can imagine and more at The IPA-SIL key layout site. This layout is excellent as it allows you to type regularly, but by using “deadkeys” (a key that you press before another which chooses the output), you can add any IPA key you’d like. Make sure you have the latest version (1.5, at time of update) installed, as some strange encoding issues were happening with newer OSes and version 1.4.
Optional Extra IPA fonts:
Doulos SIL - A differently styled IPA font from SIL, missing the bold and italic forms that Charis has. Install this at the same time you install the Charis SIL font below, using the same instructions.
SILIPA93 Fonts - These are desperately outdated, but occasionally necessary when reading other people’s old IPA. Install this at the same time you install the Charis SIL font below, using the same instructions.
So, download save them to your desktop (or a location of your choosing), and then proceed to the next step.
Power User’s Summary: Download the Charis SIL IPA Font and the IPA-SIL keyboard Layout from the above links and save them someplace you can find them.
Installing the font and keyboard layout
Now, double-click the CharisSIL(version).zip file that you saved to your desktop. It’ll unzip into a similarly named folder on your desktop. Take the CharisSILfontdocumentation.pdf file and move it to a safe place, it’s a handy guide to have around, and feel free to take a look at the readme and license files in the folder.
It’s time to install the font and layout themselves:
If you’re using OS X 10.7 “Lion” or later, Apple has hidden the /Users/yourname/Library (~/Library) folder from you by default. If you’re on Mavericks or later (10.9+), go to your Home folder (/Users/yourname) and then to the “View” menu, then “Show View Options”, then check “Show Library Folder”. Otherwise, you can use “Go” -> “Go to Folder” and type in (~/Library).
Place the four font files from the folder (CharisSILB.ttf, CharisSILBI.ttf, CharisSILI.ttf, CharisSILR.ttf) along with any of the optional fonts you’re installing into the ~/Library/Fonts folder (the “Fonts” folder inside the “Library” folder in your user directory.
Now, the layout. First, Double click “IPA-MACkbd.dmg” on your desktop. Now click the newly opened “Keyboard” Disk Image on the desktop and examine the contents.
Save “IPA Unicode (some version numbers) MAC Keyboard.pdf”! In fact, frame it. Wallpaper your wall with copies of it. Get a version tattooed on your chest. Just make sure you have it. Without this, you’ll have trouble figuring out exactly which keypresses result in which characters, and this method won’t work very well at all.
Now, drag “IPA Unicode (Version) MAC.keylayout” into the “Keyboard Layouts” in your username/Library folder. Also, if there is no “Keyboard Layouts” folder, you might have to create it yourself (File -> New Folder, then name it “Keyboard Layouts”)
You’re done! You might want to restart your computer, then everything will be all set.
Power User’s Summary: Install the font into /Users/you/Library/Fonts, and put the keyboard layout into /Users/you/Library/Keyboard Layouts. Make sure to save “IPA Unicode (version) MAC Keyboard.pdf” from the layout folder someplace accessible. Restart.
Setting up IPA Text Input on OS X 10.6-10.8
Once you’ve restarted, go to the System Preferences Application. Click the “Language and Text” (“International” on older versions), then, click the “Input Sources” (or “Input Menu”) tab inside the Language and Text Pane, and you’ll be presented with a window like this:
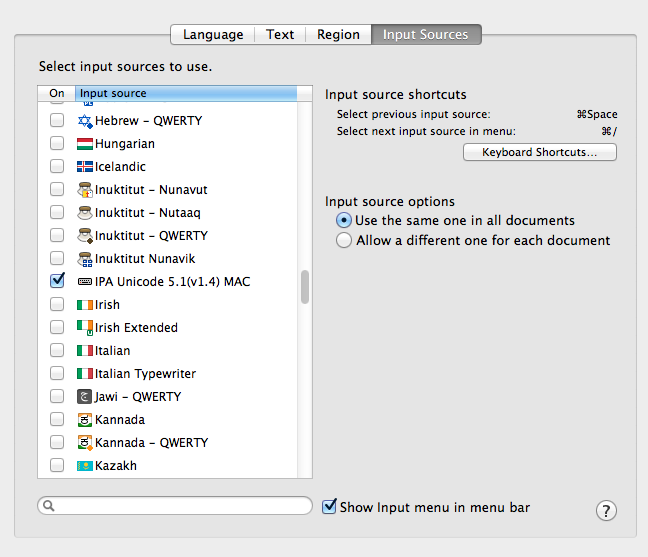
In this window, make sure and select “Keyboard & Character Viewer” (to see what symbols are where at a glance) and “Show input menu in menu bar”. Also, feel free to change the shortcut to switch input methods to make things faster for you down the road.
Setting up IPA Text Input on OS X 10.9 or higher
Once you’ve restarted, go to the System Preferences Application. Click the “Keyboard” Option. First, check “Show Keyboard and Character Viewers in the Menu Bar”, then, click the “Input Sources” (or “Input Menu”) tab inside the Keyboard Pane.
Then, click the “+” button in the bottom left of the window, Choose “Others” in the left pane, and then “IPA Unicode 6.2(v.X)”, and check “Show input menu in menu bar”.
Also, feel free to change the shortcut to switch input methods to make things faster for you down the road, under “Shortcuts”.
/hɛloʊ wɜ˞ld/!
Now that you’ve done that, you should have a little American flag in your menu bar. Congratulations! You’re now set up to use the IPA on your mac.
To test it out, fire up any text editor (OpenOffice, TextEdit, or even MS Word, if you insist) and open a document. Be very sure to select Charis SIL for your font in the document.
Now, click the little menu in the menubar and select IPA Unicode (Version) MAC:

Start typing and you’ll find yourself typing IPA symbols! You’ll slowly learn the reasonably intuitive set of key sequences (e.g: > then n for Angma, > then r for Alveolar Tap), and soon, you’ll be typing in IPA nearly effortlessly in nearly any application.
“But I don’t use IPA that often, and can’t memorize the keystrokes!”
Since Mavericks (10.9), Apple has stealthily included another way to input IPA characters which is far less efficient for regular, long-form IPA entry, but good if all you need is the occasional character. To enable this option, first, go through the steps above to get the font and keyboard set up, making extra sure to enable “Show input menu in menu bar”.
Once you’ve done this, go to the little input menu in the menu bar, then click “Show Emoji and Symbols”. To enable IPA, click the Gear in the top left corner of that window, then “Customize List”, then scroll down and check the box for “Phonetic Alphabet”.
Now, you can use that symbol picker menu to insert IPA by clicking “Phonetic Alphabet” and double-clicking the character you’d like. To add diacritics, just click the base character, then the diacritic which modifies it. Again, though, this will only work when you’re using an IPA-friendly font.
Using IPA in the Mac OS X World
With either of these methods, you can use IPA in any application, from email to messages, and it should display fine for any of your linguist friends who have suitable fonts installed.
That said, Microsoft Word, even the latest (2015) version, doesn’t always play nicely with this sort of input. I’d highly recommend that if you have troubles, you try using TextEdit (built in), Pages, or the free Office suite for OS X, LibreOffice, all of which I’ve tried and know to work fairly well. If you’re serious about IPA, though, and want your work to look good, there’s only one approach, which is to use TeX. It’s complicated, with a sharp initial learning curve, but with XeLaTeX (which allows Unicode entry) and this keyboard layout and font, you’ll have absolutely flawless IPA, all with all the numerous other benefits of using TeX.
But the very least, you should be able to copy/paste your IPA text into a word document, or hopefully even make the switch entirely to a better word processor. Although MS Word may be the most well known word processor, it’s far from being the best on OS X, and I highly encourage you to check out all the options.
Regardless, thanks to these free and open source fonts and layouts, you’ll never need to write a Word macro again on OS X. /oʊ, wʌɾə wʌndə˞fl̩ wɜ˞ld/!
Related Articles: